Pages

Tuesday, January 31, 2012

{Cupid's Mailbox}

   Anyone who knows me well can tell you, nothing makes me more giddy than creating new traditions with my little family. My kids are all young (5, 2 and 9 months) and as crazy as these ages are, I already miss them being small. I hate how fast they grow. I never want to take for granted the short time I have them at home. The best way I can see to enjoy these years is to fill them with as many memories as we can so that when they are grown we can relive them by reminiscing and remembering together.
  So, of course I was on the hunt for a fun way to celebrate the month of February. One thing I knew I wanted was for each of my kids to have a personalized Mailbox/Pouch.

   I loved this one from Pottery Barn Kids but didn't want to pay $19 a piece 


So I thought these little mailboxes from The Anderson Crew were a darling alternative 

I went straight to the dollar section at Target and snagged two. At first I thought that I would decorate them all cute myself. I thought it would be cute to modge podge scrapbook paper and/or fabric onto them. I also thought about jazzing them up with vinyl. All of which I still think would be darling! But, this time I decided my kids would have the most fun being able decorate their own mailbox. So that's what we did. I ran to Walmart and got a pack of stickers for each kid and then let them decorate their own. Here is what we ended up with.
Not quite the look I had in mind when I started out, but they were so proud of their work. They had a ball, and are so excited to start using them! I explained to them that they can use these mailboxes to leave messages or little gifts to each other to show them how much they love each other. This is right up my daughters alley. She is always drawing someone a picture or creating little gifts to give. My son on the other hand could use some help in the thinking of others department! So, hopefully this helps. 
   I also decided on 14 little sayings for simple gifts, and I plan to leave them each a small gift each day until Valentines day. I got all my gift ideas from C.R.A.F.T


Here are the ones I'm going with

1st:     A ball- you make my heart BOUNCE
2nd:   Candy- i think you're SWEET
3rd:    Orange- ORANGE you glad we are valentines
4th:    Glow stick- you make my heart GLOW
5th:    Bandaids- i'm STUCK on you
6th:    Popcorn- my heart POPS for you
7th:    Zoo Animal- i'm WILD about you
8th:    Kool Aid- i think you're KOOL
9th:    Apple- you're the APPLE of my eye
10th:  Gummy Bears- you are BEARy sweet
11th:  Shovel- i DIG you
12th:  Cracker Jacks- you CRACK me up
13th:  Peeps- you are one of my favorite PEEPS
14th:  Pencil- you're just WRITE for me

As I've been thinking more about it, I have come up with 2 ways to do it. You could have the gifts be from you OR you could have them be from Cupid. Tell your kids that Cupid comes to bring love and gifts, and to watch and see how well you show love to those around you. Either way would be fun! I think I'm just going to have them be from Mommy and Daddy. I don't think it ever hurts to express extra love to your kids. Hope you all have a fun Valentine season.


Junkie Sheri


Pin It

Monday, January 30, 2012

{Valentine's Day Wreath - UPDATE}

Ok, remember when I made that slightly satisfying Valentine's wreath at our Pinterest Project Party a few weeks ago? See picture below for a reminder.
Don't get me wrong. The wreath was kind of cute but I never really loved it. I couldn't figure out what exactly was bothering me about it. I just wanted it to be more "poofy" and full and didn't quite know what to do to change the look. Then I realized if I tied it differently I would probably get the look I was going for.

So I untied all the strips of tulle and then started completely over. Basically I just tied the tulle in knots all over the styrofoam and I added some sparkly gray tulle in there as well. Add on a big glittery bow and it was ready for the front door!


So happy to start getting for Valentine's Day around here. Everything always looks better with a little more pink! Stay tuned for more Valentine's posts to come!

Friday, January 27, 2012

{Entryway Makeover - Part 2}

Can I get a big HALLELUJAH??? My entryway is finally finished!

I have been so obsessed with this image of a fabulous entryway and the day I saw it online on Pinterest I knew I had to do something similar.

Image is from Jenna Sue (click here to see the original post and to visit her blog)


I can't believe how long it took me to actually get started on it. But once I sat down and made a list of things I was going to need, I called my Dad and asked him to come up and lend me his guidance and we were off and running.

First things first, hang the hooks.

I got this board at Home Depot (bonus: it was already painted white) and cut about 6 inches off to be the right length for my wall and then the drilling began.


We measured the right distance for each of the hooks and then began attaching them to the board.

And then the hooks were in and it was time to drill the board back into the wall once and for all.

I decided to start putting together a plan for the artwork above the hooks. I really really really wanted to have the frame with our house number and a key in it so I was bound and determined to figure out a way to make one of my own.

Here's how I did it ...

1) Bought a white 8x10 frame from Michael's for 40% off

2) Found a piece of gray/white scrapbook paper

3) Cut out the numbers and an image of a key on white card stock

I put everything together, stuck it in the frame, and ta da!


In addition to this frame, I had also ordered a digital print on ETSY that said "Welcome To Our Home."
The shop name is Print.Create.Celebrate and you can click here to view the shop and see all of the awesome stuff she has for sale. This was originally a Christmas design with completely different wording and colors and they were able to switch things out for me and make it completely my own design.


I chose gray, white, and a touch of yellow to match the pillows I have on my couch. It was perfect!

So this afternoon while my kids were asleep, I grabbed a measuring tape and my hammer/nails and decided where I wanted my frames to hang. Here is the final look!


I think I might move the frames down a couple of inches but overall I am so dang happy that the entryway is finished. I needed a new look so bad and I am super happy with the way everything turned out. And I can honestly say that without Pinterest, I doubt I would have been able to come up with these things on my own. Once again, Pinterest saves the day!

- Junkie Tawni

Pin It

Wednesday, January 25, 2012

GUEST POST from {Speak Now Photography}

Hi! I'm Cher, owner and photographer of Speak Now Photography. I am so excited to guest blogging at Pin Junkies today! Tawni and Sheri are awesome and I, like everyone else, adore Pinterest! I'm not much of a writer, so today's post will be short on words but long on pictures.

I started my photography business almost one year ago and I have LOVED it! After being a stay at home mom for almost 3 years I was ready to start working again, but not ready to go back to the "daily grind." I still wanted to be at home with my kids, but I needed a creative outlet. I have always loved photography, and became passionate about it while selecting a photographer for my wedding. I got my first DSLR four years ago, and after investing a lot of time trying to teach myself I decided to invest some money into a workshop. Best money I've spent so far for my business. I learned so much in 2 days, with hands-on experience, coaching, and critiquing. If I can offer any advice to you if you are interested in a career in photography, invest in education first, shoot with what you have, but invest in education!

As a photographer I get a TON of inspiration from Pinterest. Ideas for posing, styling, wardrobe...you name it I've found inspiration on Pinterest. If I ever feel like I'm in a creative slump I just hit up Pinterest for a boost! There have been a few times where my client had absolutely NO preference on location, setting, styling . . . NOTHING and that is hard. Once again Pinterest came to the rescue with ideas for me to draw from.

{Inspiration Photo}
original post from ontobaby.com

{My Version}


{Inspiration Photo}
original post from katemacpherson.com

{My Version}


{Inspiration Photo}
original post from divasanddreams.blogspot.com

{My Version}


{Inspiration Photo}
original post from http://www.flickr.com/photos/32159721@N08/4812372192/

{My Version}


I haven't copied any of the pinned images, but definitely have been inspired to try poses and put my own spin on it. Isn't that beauty of Pinterest? Get an idea and make it your own!!!

Happy Pinning!

- Cher Houston
Speak Now Photography

Pin It

Sunday, January 22, 2012

{Party Projects}

Well, here we are wrapping up our posts from the Pinterest Project Party with pictures of the projects that we did that night. We had such a fabulous night full of laughter, food, and we actually managed to accomplish a few projects too!


{PROJECT #1}
Marisa made this wonderful personalized dry erase board for her daughter. It's got a place for a photo, a schedule, and notes. Plus its framed in a super cute chunky black frame!

Marisa got her inspiration for her dry erase board from this one at http://delightfulorder.blogspot.com


{PROJECT #2}
Sunni chose to make the Valentine's treats and they turned out darling! She personalized them with photos of her children. Genius.

Sunni got her inspiration from this idea found at http://www.iammommahearmeroar.net


{PROJECT #3}
Michelle made a super cute Valentine's Treat Box for her son to use at school. I don't have any sons but apparently there is an extreme lack of creative ideas when it comes to treat boxes for boys. So if any of you are looking for one, there is still plenty of time to make your own before the big day arrives. She has a couple more steps to complete before it's all the way done but you can check out the link below to see what the final treat box will look like. Soooo fabulous!

Michelle's project was inspired by this one from http://gigglesgalorenmore.blogspot.com


{PROJECT #4}
Sheri and I both decided to get a jump start on our Valentine's Day decor and we chose to make Valentine's wreaths for our front doors.

Sheri's wreath was inspired by this one from http://www.ourbestbites.com


{PROJECT #5}
My wreath is far from being done. I need to add a bunch more tulle to make it thicker and I think I might even change the size of my wreath foam too. I plan to add a big flashy ribbon to hang it from as well but here's what it looked like at the end of the night.

I found my inspiration from this tulle wreath from http://www.thekurtzcorner.com


{PROJECT #6}
Cortney made a darling spring wreath for her front door too. It was sooooo soft and the perfect shade of green. I loved the little flower detail on it too!

Cortney's inspiration came from this wreath found at http://pattyschaffer.typepad.com


Kim was able to join us at the end of the party so she wasn't able to do a project but she still graced us with her wonderful presence!


Thanks to everyone who came, we had such a great night with all of you and we are looking forward to the next one!

Thursday, January 19, 2012

{Project Party Food}

One of the best parts of a Pinterest Project Party is finally getting to try out some of the AMAZING recipes we all have pinned without having to go through the work of making them all yourself. Here's a highlight of our menu this month
 
This pie is RIDICULOUS! Oreo crust, Cream Cheese filling, Chocolate Covered Strawberries! Whats not to like? It is a week later and we are still talking about it. I wish I could give credit to where this recipe came from but, the link to this pin just takes you to a picture of a desert and not the recipe. The recipe was just written in the comment portion. But here it is

 Chocolate Covered Strawberry Pie
Ingredients:

1 quart fresh strawberries- sliced
1 (8oz) package of cream cheese- room temperature
1 cup confectioners sugar
2 cups white chocolate chips
1 cup milk chocolate chips
1 cup heavy cream
1 teaspoon vanilla extract
1 chocolate pie crust (like Oreo).
Directions:

Melt 3/4 cup of of the white chocolate chips in the microwave for about 15 seconds, being careful not to burn. Set aside. 
Beat the heavy cream, vanilla extract, & 1/2 cup of the confectioners sugar with an electric mixer in a bowl until it becomes thick. 
In a separate bowl, beat together the softened cream cheese, the other half cup of confectioners sugar, & the cup of melted white chocolate. 
Gently fold the whipped cream into the cream cheese mixture. 
Spread the cream into the chocolate pie crust. Then, press the sliced berries into the mixture ALL over it. Find every single available nook & cranny, and shove a berry in it! 
Melt the remaining white chocolate in one bowl & melt the milk chocolate in another. Drizzle the melted milk chocolate on first…then the white chocolate 
Refrigerate until set.


  I dare you to try to make these and not eat the entire batch! This is the perfect snack for those of us who love sweet and salty. Another plus {or minus depending on if you actually eat the entire batch} is how quick and easy they are to make.
Pretzel Hugs
Recipe from cookiesandcups.com

Ingredients:
2 bags of Hershey’s Hugs
1 bag of Pretzels
Big baking sheet
Waxed paper – for easy removal.

Directions:

Preheat oven to 300
Unwrap Hugs and line baking sheet with waxed paper
Lay one pretzel down for every Hug and top each pretzel with a Hug.
Pop in the oven for 2 min, just until they are glossy and seem soft
Remove from oven and let sit for 1 more minute, to continue the softening process.
Now top each hug with another pretzel pushing down gently, so it sticks together.
Pop the baking sheet in the fridge for 20-30 min. to cool them off. 
Enjoy! 


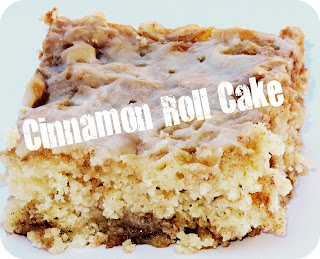
This cake was Oooey Gooey Goodness. I took the left overs home and I may have eaten the rest of the pan for breakfast and lunch the next day!

Cinnamon Roll Cake 

Ingredients:
CAKE:
3 cups Flour  
1/4 teaspoon Salt  
1 cup Sugar  
4 teaspoons Baking Powder  
1 1/2 cups Milk  
2 Eggs  
2 teaspoons Vanilla  
1/2 cup ( 1 stick)  Butter, melted
    TOPPING:
    1 cup ( 2 sticks) Butter, softened  
    1 cup Brown Sugar  
    2 Tablespoons Flour  
    1 Tablespoon Cinnamon
      GLAZE:
      2 cups Powdered Sugar  
      5 Tablespoons Milk  
      1 teaspoon Vanilla
      Directions:
        Preheat oven to 350 degrees. Spray a 9×13 glass baking pan with cooking spray. Set aside.
        In an electric or stand mixer add the flour, salt, sugar, baking powder, milk, eggs, and vanilla. Once combined well , slowly stir in the melted butter. Pour into the prepared 9×13 baking pan.
        For topping, In a large bowl mix the 2 sticks of butter, brown sugar, flour and cinnamon together until well combined and creamy. Drop evenly over the batter by the tablespoonfuls and use a knife to marble/swirl through the cake.
        Bake at 350 for 28-32 minutes or when a toothpick inserted near the center comes out nearly clean.
        FOR GLAZE:  In a medium bowl, mix the powdered sugar, milk and vanilla together with a whisk. Drizzle evenly over the warm cake. Serve warm or at room temperature.
        The perfect party punch. You will love how easy it is to throw together and how yummy it is to drink!

         Party Punch

         Ingredients:

        2 liters of 7UP 
        2 tubs of rasberry sherbert (so just equal parts!)
        lemons, oranges and grapefruit slices 

        Just posting these pictures and typing the recipes is making me so hungry for each of them. These parties could get pretty dangerous for my Health and Fitness board! Maybe next month we should have a salad theme! 

        ~Junkie Sheri


        Pin It

        Monday, January 16, 2012

        {January Project Party}


        Well, we did it! We hosted our first ever Pin Junkies Project Party last week and it was so much fun!


        What is a Project Party you might ask? Let us explain ...


        Every month the Pin Junkies will be hosting a party for fellow ladies who are on Pinterest and live in the area. We invite 8-10 girls and we all bring a treat or snack and then a project that we've been wanting to do. The projects can be anything related to scrapbooking, cooking, organizing, family traditions, crafts, parenting, church, exercise, or whatever. 

        The only rule is that the treats/snacks and the projects that everyone brings have to be something found on Pinterest. Pretty simple right?

        And what better way to get something done and eat awesome food than with a group of girlfriends?

        We had a great night talking and laughing and sharing stories and through it all, we made new friends and reconnected with others. The hours flew by and the next thing we knew, it was time to wrap up the party and call it a night.

        The recipes were so yummy and the projects all turned out great. We will be posting pictures from the party over the next couple of days so make sure to check back and see what happened. We are already looking forward to the party in February!

        Sunday, January 15, 2012

        {Sunday Snippets}

         
        Click on image to read this amazing talk. Hope you all have a happy and relaxing Sunday!


        ~ Junkies Sheri and Tawni


        Pin It

        Saturday, January 14, 2012

        {Stella's 4th Birthday}

        Well, my daughter is 4 years old as of this week. I still can't believe it!


        Back in November, my husband and I started to ask her what she wanted to do for her birthday. She had two very simple requests.

        1) Go to dinner as a family at Chuck-A-Rama
        2) Go bowling with her friends

        I had to laugh. It put a smile on my face to hear those requests because it made me realize that as long as she is surrounded by her family and friends, she would have a happy birthday.

        So since I had zero bowling items on hand and needed a starting point, I decided to get the invitations picked out/made first and then go from there. I jumped on Pinterest, not expecting to find much, but as always, ideas and inspiration are never lacking on Pinterest. 

        I found these DARLING invitations within minutes ...
        http://pizzazzerie.com (to see the original post, click here)
        ETSY Shop: Just Click Print Design Studio (click here to visit the shop)


        Ummm, love those! 


        So I ordered the invitations from ETSY that minute because I just knew that they would be perfect. 


        Side Note: This shop is AMAZING! The invitations were customized, ordered, printed, and picked up when I found out that we had to change the location and time of the party. I immediately asked to have  JustClickPrint Design Studio to redo them for me and was prepared to pay her. She did it within a couple hours and didn't charge me a penny. I appreciated her excellent customer service and willingness to help me out so much!


        On the morning of her actual birthday, I wanted to have something fun in her bedroom to wake up to. I considered hanging a banner or crepe paper across the room but then I saw some way cute pictures on Pinterest where balloons were used to fill up a room and just floated on the ceiling. 


        So after looking at those ideas, I got my balloons ready the night before and then we stuck them in her bedroom the next morning before she woke up.

        It was an instant hit. She LOVED it.


        So thank goodness for Pinterest. It gave me some great birthday ideas and I must say, the balloons in the bedroom will now be a family tradition for our kids. So simple and yet such a hit. That's what it's all about.


        - Junkie Tawni